
Here is how I do it.
Start with a tube of Oxy-10 zit cream. That is the brand name. But you might be interested in buying a knock-off or a generic version. Same product, but big price difference. I use Wal-Mart's Equate brand. Good stuff and less than $2 a tube.
Purchase the white cream. This type of product comes in a gel and also in a "vanishing" cream. It is flesh-toned. The creamy product is what you are looking for. Why? It's easier to see where you are applying it. The gel has a tendency to dry quickly too.
You will also need a piece of cellophane, cut slightly larger than the stained area.
Apply a thick coat of the zit cream on the stain.
Cover the cream with the cellophane. The keeps it from drying so fast.
Change it daily until the stain is completely diminished.
This can take awhile. The stain has been there for decades so in reality, applying, removing, reapplying, etc. for a couple weeks is a relatively short time.

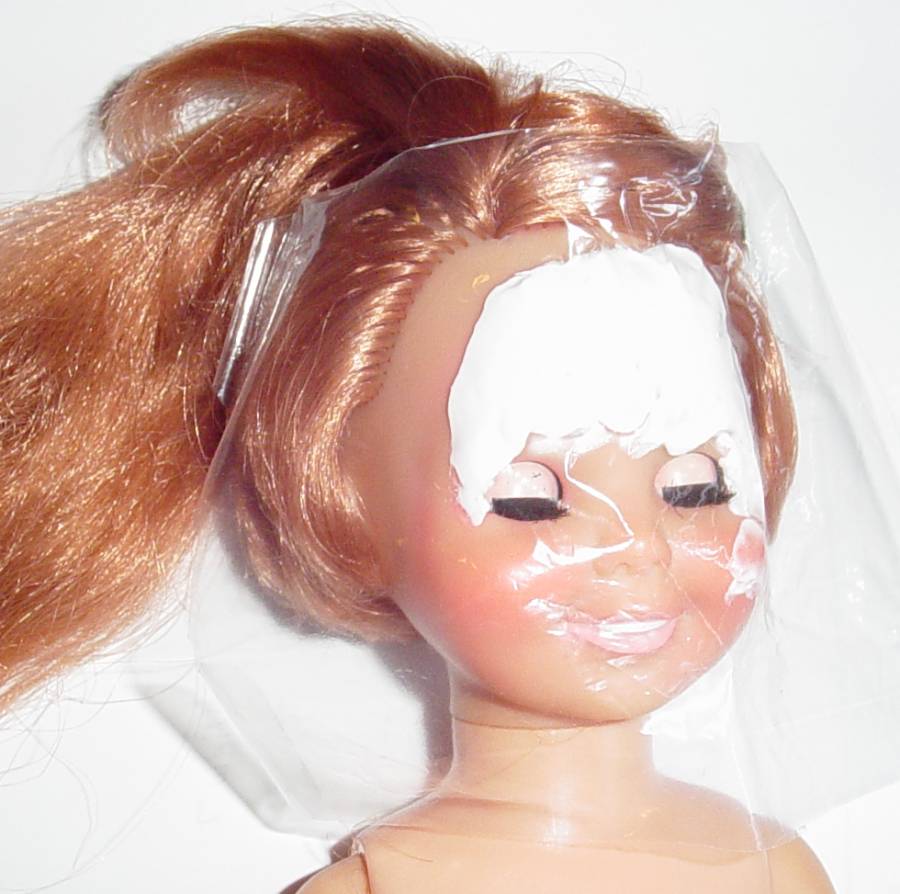
This is what Cricket looks like while her face is bleaching. Since there is such a large area to bleach, I will work on the forehead and eyes area first, then follow up on the cheeks and lip area.

After 3 days, she is on her first removal and replacement of the zit cream. She is about 40% bleached.

Here she is after 8 days. Wow! We are at about 85% now. There are no more red stains on her cheeks, temples and mouth area.

We're at ten days... Cricket spent a couple hours in the warm car while we watched a movie. Look at this! She's at about 95% now. The pink is gone at the corners of her eyes. Just a smidge left on the outer areas of her eyebrows. Won't be long now.

Sometimes, established collectors will admonish new collectors to sit the doll in the sun while she bleaches. This does speed up the process but I can't condone it. There are two reasons. The first is that UV rays from the sun are very effective at initiating plasticizer breakdown. Your doll needs plasticizer to keep her pigment and to keep the vinyl soft. Also, after only a few hours, it causes the Oxy-10 to remove the actual pigment in the vinyl. It's very risky. What is really happening is that the warmth from the sun is warming up the product. Oxy bleaches work best when warm, as all hairdressers know (this is why we cover the product and the processing hair with plastic and place you under a warm dryer). If I will be "around" then I will warm up the product a couple times a day with a warm (not hot) blow dryer. It won't dry since it's covered with cellophane.
Another thing one can do, is place the doll in a very warm car parked in the sun. Check it after every half hour. This is my preferred method for keeping the oxy-bleach warm and to speed up the bleaching process. No UVs... and it's fast.
Just a note... the styrene plastic body and legs clean really well and don't normally need to be bleached.
Results:
Day One - On the first day, about 90% of the red on Cricket's forehead is gone. The ink staining is heavy on her eyebrows. I will retreat that area now with a heavy coating and also concentrate on the corners of her eyes, taking care not to get it in her eyes.
Day Three - At this point, about 40% of the ink is gone. I've been very busy these three days... so I've not been warming up the bleach to speed up the process. Still, I'm very happy with the results thus far.
Day Eight - WOW! I left her for a couple hours in my parked car at work. She is about 85% now. Won't be long!
Day Ten - I really like keeping the bleaching product warm in a car on a sunny day. Seems very efficient and I don't have to worry about UV rays from the sun breaking my doll down prematurely.
Day Seventeen - Every day, I have changed the oxy product and placed it only on her eyebrows. This must have been very deep-seated staining. I don't think I've ever seen it this stubborn. She has also spent a couple days in a sun-warmed car to accelerate the bleaching process. Based on the final picture above, isn't she a great addition to the archive and for only $15!
I hope this page is helpful for you. It's really a very easy process. I know you can do it. However, I cannot guarantee that you will have absolutely perfect success. I say this because sometimes the offending stains are so deep in the doll's vinyl that bleaching for a long period of time might actually start removing her pigmentation. It's a risk, granted, but I think most collectors are willing to take it, especially if you find a great doll at a great price like our model doll above. Best wishes to you!!
All photography and text, unless otherwise noted, are the property of the author of this website and may not be copied and used for any purpose.

© May, 2007, by Beth-Ellen Colvin